From Dollswest, another variation on the knitted tank top.
Sunday 23 May 2010
Saturday 22 May 2010
For Maple
I also finished another sweater yesterday. This is a quick basic top down raglan, knitted on size 2.25mm needles in a cashmere blend wool. The colour is a pretty royal blue with flecks of dark red and green. I washed it and it is so, so soft.


Friday 21 May 2010


Wednesday 19 May 2010
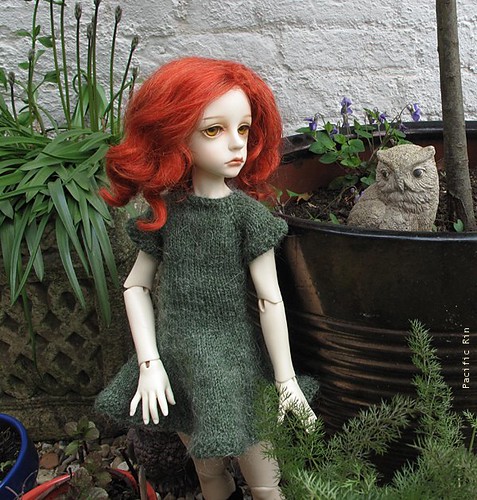
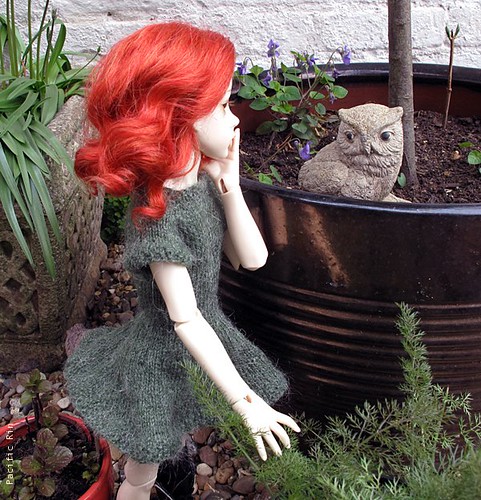
Autumn Colours
This has always been a favourite look - matching jumper and woolly tights. The outfit is 60's based, from a Daisy & Willow doll.


WIP: navy & white stripes

adapted from a Dollswest pattern.
I'm using J&S 2-ply lace-weight Shetland, on size 1.5mm needles.
I started this at the end of March and have found it slow going, especially the cable parts in dark wool on tiny needles.
But I'm on the home straight now, I love joining sleeves to the yoke and doing raglan decreasing.
Sunday 16 May 2010
Black and red.


I've made Doon another cardigan - a basic top down raglan (own pattern) from red cotton.
Friday 14 May 2010


Thursday 13 May 2010
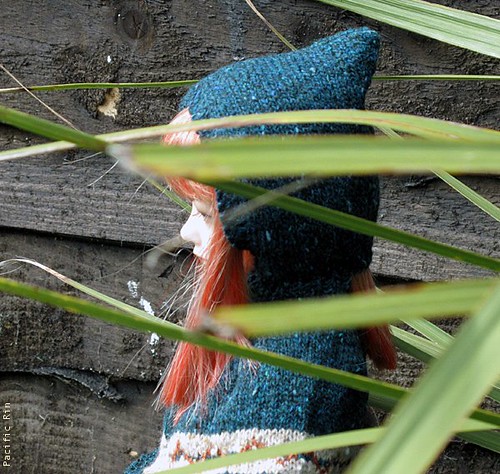
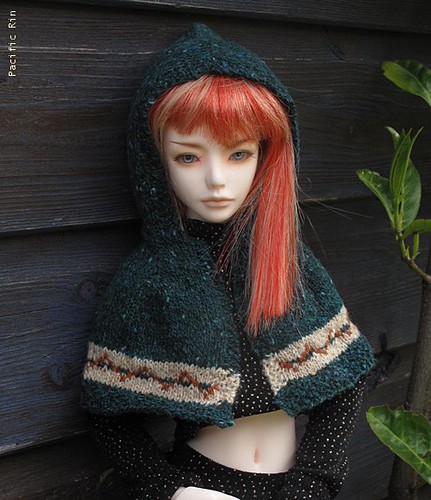
Cape!

I've knitted Doon a short hooded cape (my own pattern). I was going to make a jacket but then thought a short cape would be much more Doon's style. I enjoyed doing the fair-isle section!
Wednesday 12 May 2010
Knit-a-long: Basic Top Down Raglan Jumper part 3
We are on the home straight now!
Okay, ready? kn1t kn1t kn1t
Place 23 sts from one stitch holder back onto a needle and purl 1 row.
Row 1: Knit, increasing 1 st (Kf&b) each end of row. (25 sts)
Row 2: Purl
Row 3: Knit
Row 4: Purl
Row 5: repeat row 1. (27 sts)

Now carry on in stocking stitch until your required length. *
*Make sure you keep a note of how many rows you've worked as you need both sleeves to be the same in length!
You can easily keep trying the jumper on your doll for fit.
Note: If you're going for a long sleeve, when measuring the sleeve don't hold the doll's arm straight, remember it bends and the sleeve will rise up.
I was going to do short sleeves for Leo but then found I had enough wool to do long ones - I did 50 rows total of st.st.
Work 4 rows in KI P1 rib [i]at the same time[/i], P2tog at end of first row.
That way the rest of your rows begin with a K1.
Cast off in rib, leaving a long length of yarn for sewing up.
Repeat for 2nd sleeve.
That's all the knitting finished, now onto the sewing up.
This is where most knitters fall by the wayside as we like knitting and not sewing.
At least with the top down raglan the setting in sleeves bit is eliminated.
Sew the sides of the sleeves - I use back-stitch as I never have worked out how to do that invisible seaming, then tidy up the gap at the armhole - a couple of over stitches will secure.
If you want to, sew part way up the back then sew on buttons, poppers or hooks.
Press seams flat - and press jumper, it will look better.
Try jumper on your doll, take photos and pat yourself on the back and be PROUD.


This pattern is very versatile, you can make the sweater long, short, standard. You can make it as a cardigan by doing the first 2 or 3 sts as knit stitches all the way down and adding buttonholes at intervals or sewing poppers. You can do long sleeves, short sleeves.
You can do moss stitch borders or no borders at all and the jumper edges will just curl.
Use thicker wool and larger needles.
The main thing is have fun!
Okay, ready? kn1t kn1t kn1t
Place 23 sts from one stitch holder back onto a needle and purl 1 row.
Row 1: Knit, increasing 1 st (Kf&b) each end of row. (25 sts)
Row 2: Purl
Row 3: Knit
Row 4: Purl
Row 5: repeat row 1. (27 sts)
Now carry on in stocking stitch until your required length. *
*Make sure you keep a note of how many rows you've worked as you need both sleeves to be the same in length!
You can easily keep trying the jumper on your doll for fit.
Note: If you're going for a long sleeve, when measuring the sleeve don't hold the doll's arm straight, remember it bends and the sleeve will rise up.
I was going to do short sleeves for Leo but then found I had enough wool to do long ones - I did 50 rows total of st.st.
Work 4 rows in KI P1 rib [i]at the same time[/i], P2tog at end of first row.
That way the rest of your rows begin with a K1.
Cast off in rib, leaving a long length of yarn for sewing up.
Repeat for 2nd sleeve.
That's all the knitting finished, now onto the sewing up.
This is where most knitters fall by the wayside as we like knitting and not sewing.
At least with the top down raglan the setting in sleeves bit is eliminated.
Sew the sides of the sleeves - I use back-stitch as I never have worked out how to do that invisible seaming, then tidy up the gap at the armhole - a couple of over stitches will secure.
If you want to, sew part way up the back then sew on buttons, poppers or hooks.
Press seams flat - and press jumper, it will look better.
Try jumper on your doll, take photos and pat yourself on the back and be PROUD.
This pattern is very versatile, you can make the sweater long, short, standard. You can make it as a cardigan by doing the first 2 or 3 sts as knit stitches all the way down and adding buttonholes at intervals or sewing poppers. You can do long sleeves, short sleeves.
You can do moss stitch borders or no borders at all and the jumper edges will just curl.
Use thicker wool and larger needles.
The main thing is have fun!
Sunday 9 May 2010
Knit-a-long: Basic Top Down Raglan Jumper part 2
Okay, now we have to separate the sleeves from the body. The next row is quite tricky to explain. I've tried to take pix but holding a camera in one hand and knitting in the other, well - blurryish pictures, sorry!
Row 16: K1, Purl to 1st marker, remove marker, slip 23 sts onto a st.holder, remove marker, turn work to right side and cast on 4 sts using "backwards loop" cast on method.
Basically, you're making a twist in the yarn and then slipping the loop onto the needle to make a stitch. It is tricky, you made need a few goes.


Row 16 continued: turn work back to wrong side facing you, purl 26 sts, remove marker, slip 23 sts onto a st.holder, remove marker, turn work and cast on 4 sts as before, turn work, purl to last st, K1.

Now we're going to be working on the body section only - 62 sts.
Nxt row:- Knit all sts, being careful over the cast-on stitches.
Nxt row: Purl all sts (no need to do the KI edging anymore).
Now carry on in plain stocking stitch until your required measurement for the body. I wanted a short sweater for Leo so did 20 rows.

(I'm about half way there in this picture)
The beauty of this method is you can try the garment on the doll as you go. It's easier if you are using a circular needle, if not just transfer the stitches onto a length of yarn and then transfer back onto the needles.
When you are at the length required work 4 rows in K1P1 rib, then cast off in rib.
STOP.
Row 16: K1, Purl to 1st marker, remove marker, slip 23 sts onto a st.holder, remove marker, turn work to right side and cast on 4 sts using "backwards loop" cast on method.
Basically, you're making a twist in the yarn and then slipping the loop onto the needle to make a stitch. It is tricky, you made need a few goes.
Row 16 continued: turn work back to wrong side facing you, purl 26 sts, remove marker, slip 23 sts onto a st.holder, remove marker, turn work and cast on 4 sts as before, turn work, purl to last st, K1.
Now we're going to be working on the body section only - 62 sts.
Nxt row:- Knit all sts, being careful over the cast-on stitches.
Nxt row: Purl all sts (no need to do the KI edging anymore).
Now carry on in plain stocking stitch until your required measurement for the body. I wanted a short sweater for Leo so did 20 rows.
(I'm about half way there in this picture)
The beauty of this method is you can try the garment on the doll as you go. It's easier if you are using a circular needle, if not just transfer the stitches onto a length of yarn and then transfer back onto the needles.
When you are at the length required work 4 rows in K1P1 rib, then cast off in rib.
STOP.
Saturday 8 May 2010
Knit-a-long: Basic Top Down Raglan Jumper part 1
I'm hosting a Knit-a-long on the Dolly Rocket forum.
Okay, though I used to be a pattern writer, I have never done this publicly before and this sort of thing is quite different. I've found that people can interpret patterns in very different ways so please bear with me *nervous*
The important thing is to read all the instructions through before you begin.
BASIC TOP DOWN RAGLAN JUMPER.
My model is a Dollmore Kid - MSD. Chest = 18.5 cm and waist = 16.5cm.
If your doll is larger then go up a needle size or two. If you want to make this for an SD then add more stitches to start.
Okay, here we go >>>>
With size 2mm needles (UK14, US0) and any 4-ply or sock yarn, cast on 40 sts in your preferred method. I use thumb method (called long-tail in US).
(Google "cast on methods" if you want to find tutorials).
Work 3 rows in KI P1 rib. *
* If you want to make a buttonhole, work row 3 like this: K1P1 to last 3 sts, move yarn forward, (to front of work) K 2 together, P1.


Nxt row: Wrong side facing, P7, place marker, P7, place marker, P12, place marker, P7, place marker, P7. *
* If you have made the buttonhole purl the yarn forward stitch in the normal way, do not twist it as you need a hole to form.

Now, you will be increasing 1 stitch each side of the markers to create a raglan.
8 stitches will be increased on each knit row.
Row 1: *(K to 1 st before marker, increase by Kf&b into st. (knit front and back), slip marker, Kf&b into next st)*, rep from * - * 3 more times, K to end. (8 stitches increased).

Row 2: K1, purl to last st, K1 - slipping markers.
Repeat rows 1 & 2 until there are 96 sts. (14/21/26/21/14) *
*at the same time, make a buttonhole as before on row 11.
row 15: Increase sts for sleeves only: K14, slip marker, kf&b, K19, Kf&b. slip marker, K26, slip marker, kf&b, K19, kf&b, slip marker, K to end.

STOP!
Okay, though I used to be a pattern writer, I have never done this publicly before and this sort of thing is quite different. I've found that people can interpret patterns in very different ways so please bear with me *nervous*
The important thing is to read all the instructions through before you begin.
BASIC TOP DOWN RAGLAN JUMPER.
My model is a Dollmore Kid - MSD. Chest = 18.5 cm and waist = 16.5cm.
If your doll is larger then go up a needle size or two. If you want to make this for an SD then add more stitches to start.
Okay, here we go >>>>
With size 2mm needles (UK14, US0) and any 4-ply or sock yarn, cast on 40 sts in your preferred method. I use thumb method (called long-tail in US).
(Google "cast on methods" if you want to find tutorials).
Work 3 rows in KI P1 rib. *
* If you want to make a buttonhole, work row 3 like this: K1P1 to last 3 sts, move yarn forward, (to front of work) K 2 together, P1.
Nxt row: Wrong side facing, P7, place marker, P7, place marker, P12, place marker, P7, place marker, P7. *
* If you have made the buttonhole purl the yarn forward stitch in the normal way, do not twist it as you need a hole to form.
Now, you will be increasing 1 stitch each side of the markers to create a raglan.
8 stitches will be increased on each knit row.
Row 1: *(K to 1 st before marker, increase by Kf&b into st. (knit front and back), slip marker, Kf&b into next st)*, rep from * - * 3 more times, K to end. (8 stitches increased).
Row 2: K1, purl to last st, K1 - slipping markers.
Repeat rows 1 & 2 until there are 96 sts. (14/21/26/21/14) *
*at the same time, make a buttonhole as before on row 11.
row 15: Increase sts for sleeves only: K14, slip marker, kf&b, K19, Kf&b. slip marker, K26, slip marker, kf&b, K19, kf&b, slip marker, K to end.
STOP!
Wednesday 5 May 2010
Smilla is back!
To celebrate her return, I made her a jumper from the leftovers from Doon's cardigan plus a bit of aqua 4-ply.

Monday 3 May 2010
Gypsy girl

My own pattern, a blouse with ruffle collar. The shape is based on a favourite blouse by mhd.

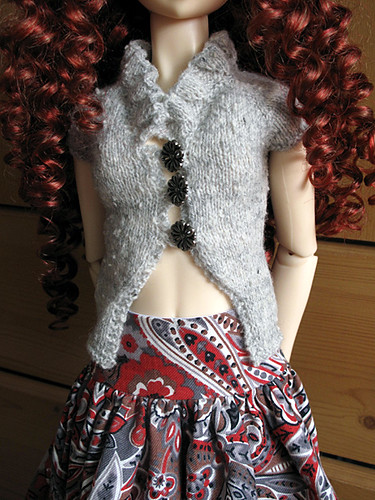
Back shaping:-
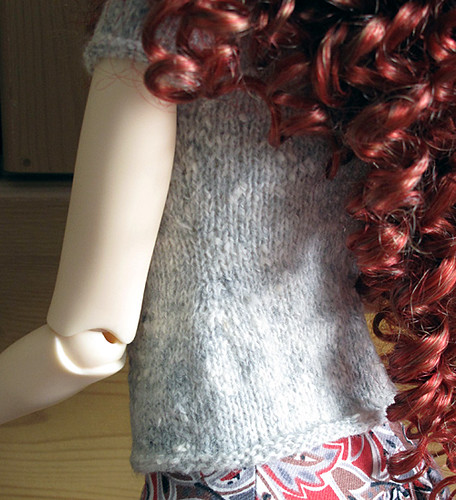
Detail of collar:-

Subscribe to:
Posts (Atom)